BigRig - Rig Tools for Autodesk Maya
Version 1.3
March 2022
Compatibility: Maya 2019, 2020, 2022, 2023 - Python 2.7, Python 3
The latest release of BigRig is available for download here.
BigRig is a small rigging tool for Autodesk Maya developed by Roberto Menicatti, extending an initial code by Eleonora Vanin and Riccardo Stincone. It started as a school side-project at BigRock Institute of Magic Technologies and it’s not meant to be an alternative to the other rigging plugins you may find on the web. At the moment, further development is not planned to happen on a regular basis.
The script provides some quick commands to create FK and IK chains, it helps in rigging characters’ arms, hands and legs and provides useful functionalities to rename nodes and handle control curves, speeding up the process of mirroring, merging, replacing, grouping and coloring curves.
Quick Guide
To rig the limbs of your character, place and orient 5 joints on the left leg mesh and 3 joints on the left arm mesh as in the following figures, then freeze their rotations.

Add two locators, called L_Toe_Roll_LOC and L_Heel_Roll_LOC where you want the rotation pivots for toe roll and heel roll to be.
Select the 5 leg joints and run Rig Leg and Mirror to mirror the left leg joints onto the right one, rename all of them, and rig both legs with FK and IK controls.
Select the shoulder joint and run Rig Arm and Mirror to mirror the left arm joints onto the right one, rename all of them, and rig both arms with FK and IK controls.
Run Create Hand Joints for the left side, then position and orient the newly created finger joints as in figure and freeze their rotations.
Run Rig Hand and Mirror to mirror the left hand joints onto the right one, rename all of them, and rig both hands with spread, cup, fan and curl controls and attributes.
In all of the above cases, insert a scale factor for the control shapes and tick the side where you placed the joints before running the relative commands.
Run Open Hand Tuner if you want to tune the “weights” of the hand spread, cup, fan and curl.
Run Create Shoulder Twist and Create Elbow Twist on both arms if you want to add twist.
Use the command Replace Curve and Color Selected Controls to customize the controls created by the script.
On the menu bar, click on Help → Help to read a description of each command directly from BigRig interface, or Help → Online Guide to be redirected to this page. Read the following Sections to have a better understanding of each and every step and function.
Download and Install
First, download the latest version of BigRig here. After downloading the zipped folder, uncompress it wherever you want and move the inner content, i.e. BigRig folder, to Maya scripts folder. Depending on how you unzipped the folder, you may have two nested BigRig folders; make sure to move the inner one, which is the one containing the Python files.
You cand find Maya scripts folder here:
- on Windows
<user’s directory>/Documents/maya/scripts/ - on macOS
Library/Preferences/Autodesk/maya/scripts/
Then, open bigrig_shelf.py with a text editor, copy the few lines of code you will find and paste them into Maya Script Editor. Click on File → Save Script to Shelf… to add BigRig to the active shelf. Finally, click on the new shelf button to run BigRig.
Optionally, you can edit the shelf icon and use the BigRigGUIIcon.svg file that you can find inside the icons folder of BigRig folder.
Interface
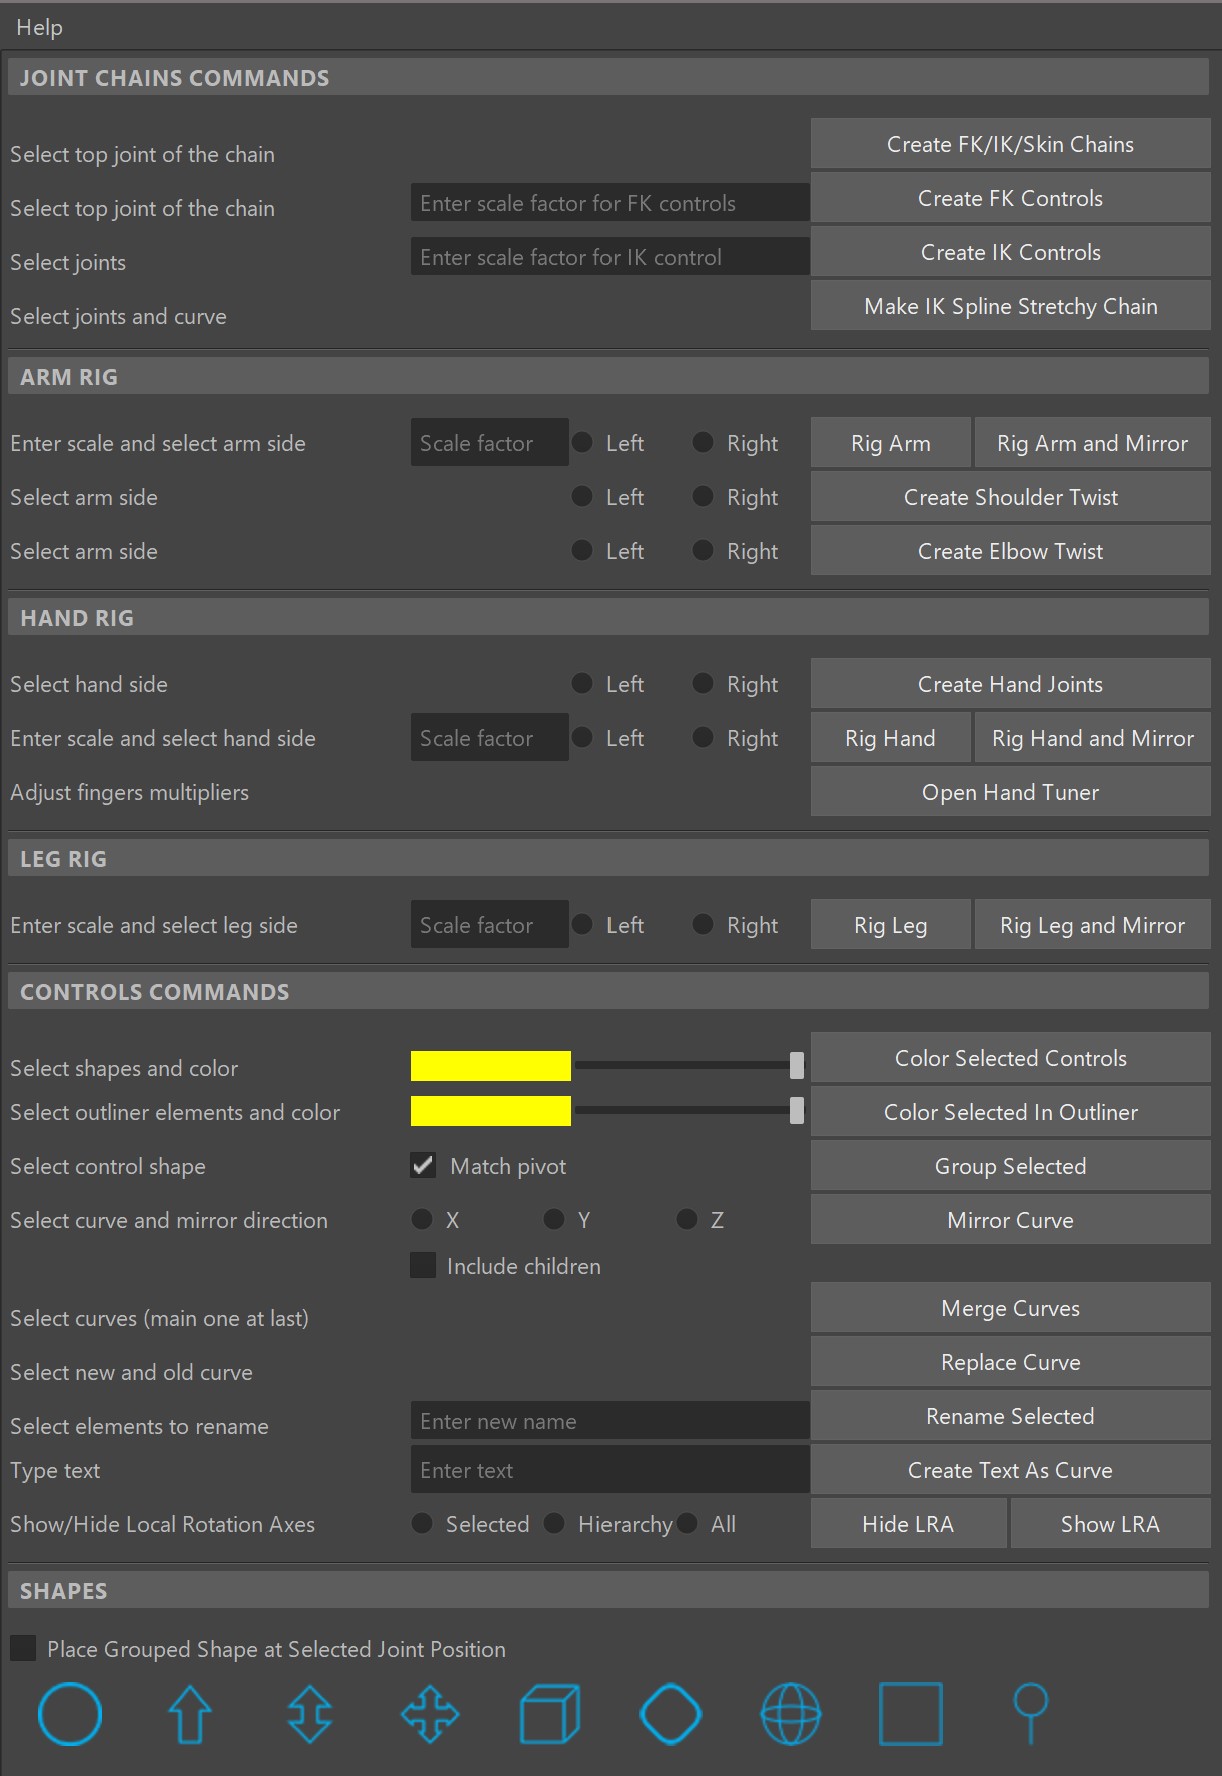
BigRig interface is shown in the following figure. The window is dockable anywhere within Maya interface.
The Help menu consists of the following items:
- About: it shows version and authors information;
- Changelog: it shows what’s new in every new version of BigRig;
- Help: it shows a description for each BigRig command;
- Online Guide: it opens the online official documentation, i.e. this page.
How to Rig Character Limbs with BigRig
First of all make sure that your character is correctly oriented in Maya world, i.e. with the face pointing towards positive Z axis (from Maya front view you should see character’s front). Beside being good practice, it is also necessary for the Rig Leg command to work.
In order to orient the joints correctly we suggest the use of Coplanar Joint Orient script by Ilya Seletsky. If you’re using a version of Maya based on Python 3 (Maya 2020 or newer), then use our update of Coplanar Joint Orient - Py3.
Rigging the Legs
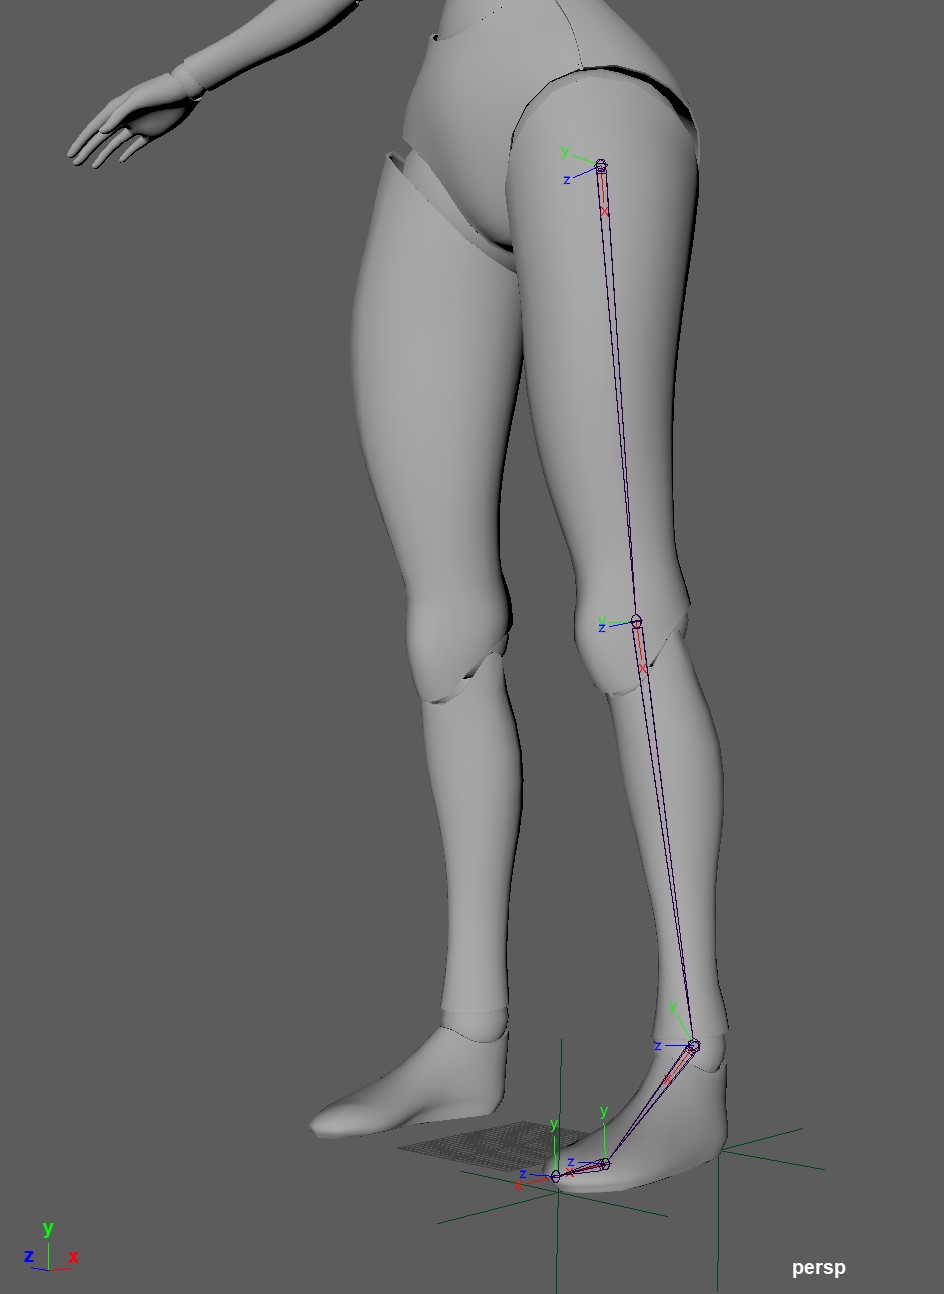
Start creating a joint chain by placing the hip, knee, ankle, foot and toe joints on the character’s left or right leg. You don’t need to rename them, as they will be automatically renamed by the script.
Use Coplanar Joint Orient script to orient the joints by selecting X as the aim axis, Z as the turning axis and make sure that the Y axis of the foot joint is directed upwards, as Maya world Y axis. Orient the toe joint as its parent joint: click on Maya menu Skeleton → Orient Joint (options), tick Orient Joint to World and click Orient. Then freeze the rotations of the joints.
Create two locators, called L_Toe_Roll_LOC and L_Heel_Roll_LOC (replace L_ with R_ if you choose to start with the right leg) and place them where you want the rotation pivots for toe roll and heel roll to be (refer to Fig. 1).
Then:
- select the five joints of the chain from hip to toe;
- on the left side of Rig Leg BigRig command insert a scale factor for the control shapes;
- select the leg side according to where you placed the joint chain;
- finally run one of the two BigRig commands Rig Leg or Rig Leg and Mirror. Run the first one if you need to rig one leg only, run the second one to rig both legs without the need to mirror anything manually.
In order to know which scale factor to use, you can create a temporary Nurbs circle, match it with a joint and scale it until it reaches the desired size. Copy the scale value from the Channel Box, delete the circle you just created and paste the scale value inside BigRig.
Both legs are now rigged with FK and IK controls, which can be switched from the attribute of Foot_Switch_CTRL placed at the back of each ankle joint.
If the command is run on Maya 2020, the knee twist can be controlled from the Knee Twist attribute of the foot control in the Channel Box. You can turn off the visibility of the knee control shape from the foot control.
If you want to change any of the control curves created by the script refer to Replacing a Control Curve Section.
Rigging the Arms
Start creating a joint chain by placing the shoulder, elbow and wrist joints on the character’s left arm. You don’t need to rename them, as they will be automatically renamed by the script.
Use Coplanar Joint Orient script to orient the joints by selecting X as the aim axis, Z as the turning axis and make sure that the Y axis of the joints is pointing towards the inner side of the arm bend. Orient the wrist joint as its parent joint: click on Maya menu Skeleton → Orient Joint (options), tick Orient Joint to World and click Orient (refer to Fig. 2). Then freeze the rotations of the joints.
Then:
- select the shoulder joint of the chain you just created;
- on the left side of Rig Arm BigRig command insert a scale factor for the control shapes;
- select the arm side according to where you placed the joint chain;
- finally run one of the two BigRig commands Rig Arm or Rig Arm and Mirror. Run the first one if you need to rig one arm only, run the second one to rig both arms without the need to mirror anything manually.
In order to know which scale factor to use, you can create a temporary Nurbs circle, match it with a joint and scale it until it reaches the desired size. Copy the scale value from the Channel Box, delete the circle you just created and paste the scale value inside BigRig.
Both arms are now rigged with FK and IK controls, which can be switched from the attribute of Hand_CTRL placed at the back of each wrist joint.
Run the commands Create Shoulder Twist and Create Elbow Twist if you want to add twist joints to the upper arm and the forearm.
If you want to change any of the control curves created by the script refer to Replacing a Control Curve Section.
Rigging the Hands
After rigging both arms with either the Rig Arm command or the Rig Arm and Mirror command, you can run the command Create Hand Joints by selecting either the left or right side on BigRig.
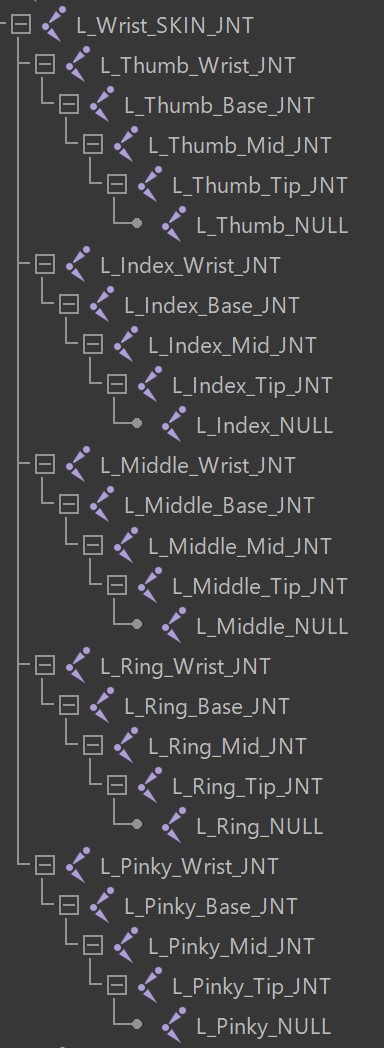
This command creates five joint chains parented to the wrist joint of the selected arm, named as in the following figure.
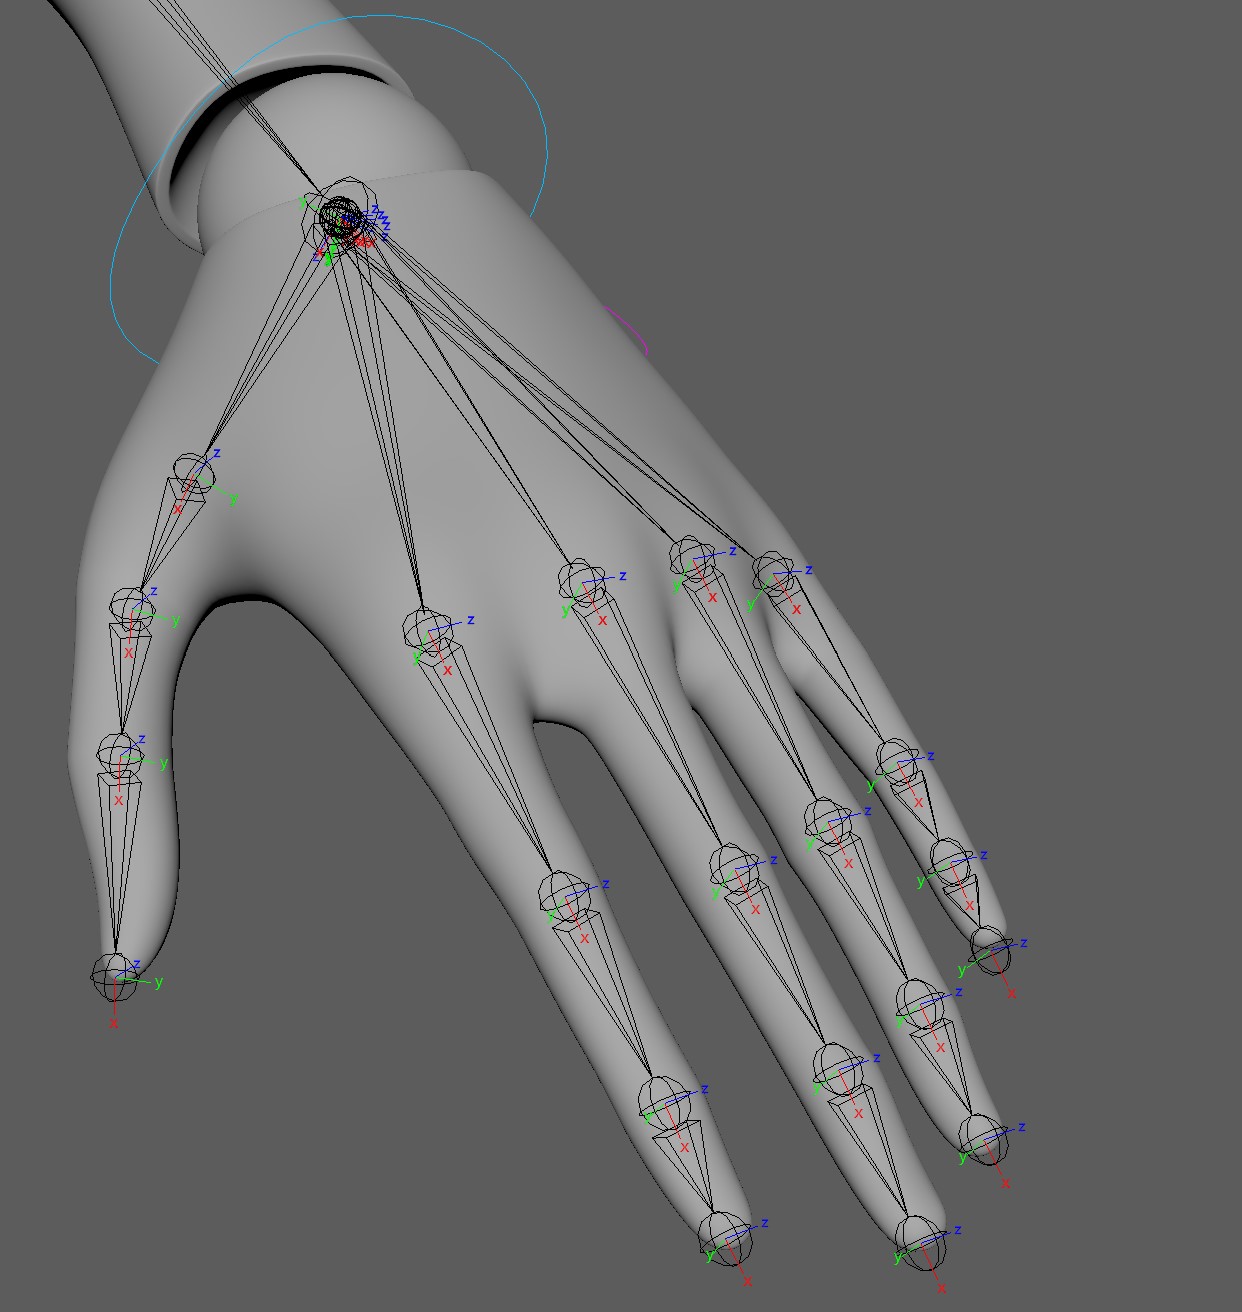
Keep the finger wrist joints where they are, at the wrist joint position, place the base, mid and tip joints on the finger knuckles and the finger NULL joints at the tip of each finger.
Use Coplanar Joint Orient script on each finger to orient the joints from base to NULL by selecting X as the aim axis, Z as the turning axis and make sure that the Y axis of the joints is pointing towards the inner side of the finger bend. Orient the finger NULL joint as its parent joint: click on Maya menu Skeleton → Orient Joint (options), tick Orient Joint to World and click Orient. Then freeze the rotations of the joints.
Rerun Coplanar Joint Orient on each finger for the finger wrist and the base joint. You don’t want to include the finger wrist joint in the previous step, since it is not aligned with the real finger joints. (Refer to Fig. 3).
Then:
- on the left side of Rig Hand BigRig command insert a scale factor for the control shapes;
- select the hand side according to where you placed the joint chains;
- finally run one of the two BigRig commands Rig Hand or Rig Hand and Mirror. Run the first one if you need to rig one hand only, run the second one to rig both hands without the need to mirror anything manually.
In order to know which scale factor to use, you can create a temporary Nurbs circle, match it with a joint and scale it until it reaches the desired size. Copy the scale value from the Channel Box, delete the circle you just created and paste the scale value inside BigRig.
The control of each hand, L_Hand_CTRL and R_Hand_CTRL, is now enriched with attributes to control the curl, the spread, the backward fan, the forward fan, the palm cup a the palm spread of the hand as well as the curl and the spread of each individual finger. Control curves are also created for each finger knuckle joint and their visibility can be toggled from an attribute in the hand control.
If you want to change any of the control curves created by the script refer to Replacing a Control Curve Section.
The behavior of each attribute is handled automatically via nodes, but the default values in the different MultiplyDivide nodes may not be suitable for the character mesh you are using. In order to tune these values you could open the node editor and look for each specific node, but this would be a tedious and prone to error task. Run BigRig command Open Hand Tuner to open a window showing all the multipliers for each required node, as displayed in figure.
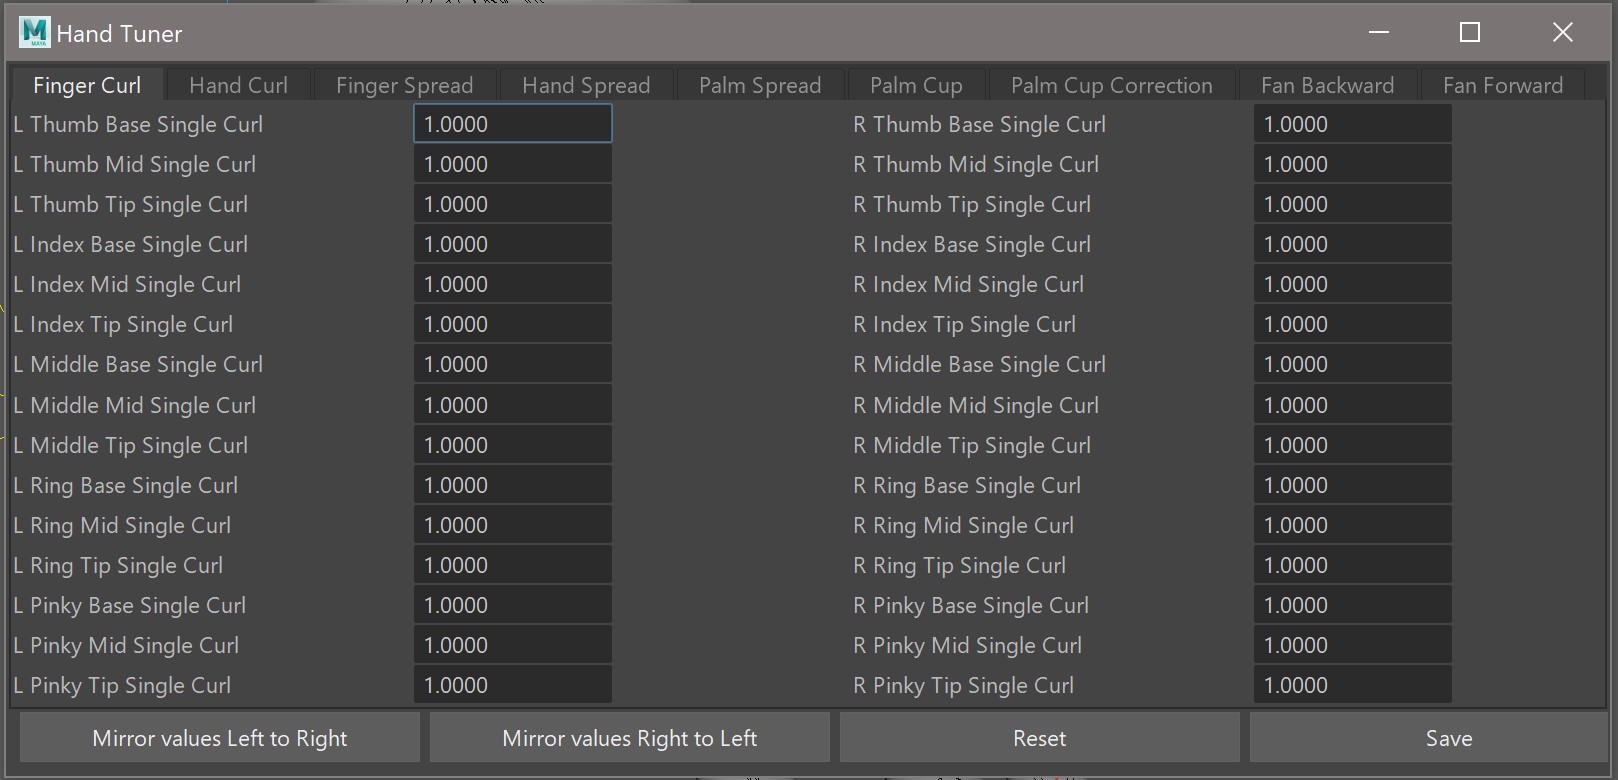
When the hand is in its default pose, no attribute is active, so even if you changed any of the parameter in the Hand Tuner window you wouldn’t see any difference. Before starting to tune the different parameters, change the value of the hand attribute you want to tune in the Channel Box, in order to see how the pose is improved.
In order to change a parameter you can either:
- type the new value and press
Enterto save it; - press
Ctrland drag on the value to change it and save it at the same time while dragging; - or just type the value and then click on the Save button.
If you want to copy the values entered for one side to the other side, click on the Mirror values Left to Right or Mirror values Right to Left accordingly. Only the values of the active tab are copied. Signs are reversed automatically where necessary.
If you want to reset the parameters to their default values, click on the Reset button. Only the values of the active tab are reset.
Replacing a Control Curve
If you want to change one of the control curves created by the script:
- create the new curve at the origin of Maya world;
- select the curve you just created;
- press
Ctrl(Windows) orCmd(macOS) and select the curve you want to replace, to add it to current selection; - click on BigRig Replace Curve command.
If you want to replace the corresponding curve on the other side of the rig too:
- select the control curve you want to mirror;
- click on BigRig Mirror Curve command after ticking X as mirroring axis;
- select the mirrored curve just created;
- freeze the rotations if necessary (it is required if the controls on the two sides have the same orientation, e.g. leg controls);
- press
Ctrl(Windows) orCmd(macOS) and select the curve you want to replace, to add it to current selection; - click on BigRig Replace Curve command.
Commands
Generic Commands
-
Create FK/IK/Skin Chains
This function creates two copies of the selected joint chain and creates a control to switch the behavior of the original chain so that it works as either one or the other. The two new chains are supposed to become an FK and an IK chain but the controls and the ikHandles are not created and should be created with the commands Create FK Controls and Create IK Controls if desired. -
Create FK Controls
This function creates a circular control for each selected joint and connects the rotations of each control with the rotation of the corresponding joint via nodes. -
Create IK Controls
This function creates an ikHandle between the first and last joint of the selection, a pole vector constraint and creates a control for both of them. -
Make IK Spline Stretchy Chains
Given a joint chain and a base curve, this function duplicates the curve, makes the division between the length of the second one (deformable) and the original one (fixed) and uses the resulting value as stretching factor for the joint chain by putting this value as Scale X input of each joint. Select the joints chain and the curve, then run the function.
Arm Rig
-
Rig Arm
This function creates the rig for the selected arm starting from a joint chain consisting of the shoulder, the elbow and the wrist joint placed correctly along the arm. Joints should be oriented with the Z axis as turn axis and the Y axis pointing towards the inner side of the arm bend and are automatically renamed by the script.
Select the arm, insert a scale value for the control shapes and run the command.
An FK and an IK chains are created, each one with its own controls, while the original chain becomes the Skin chain.
A control for the hand is created with a switch attribute to change the behavior of the Skin chain. -
Rig Arm and Mirror This function creates the rig for the selected arm, mirrors the joints and create a rig for the opposite arm.
-
Create Shoulder Twist
This function adds shoulder twist joints to the selected arm. -
Create Elbow Twist
This function adds elbow twist joints to the selected arm.
Hand Rig
-
Create Hand Joints
This function creates five joint chains parented to the wrist joint of the selected side and renames each joint correctly, e.g. L_Index_Base_JNT. The joints must be manually placed and oriented.
Keep the “finger_Wrist” joints placed at Wrist Joint position. -
Rig Hand
This function adds the controls for each finger and the attributes for curl, fan, spread and cup to the hand control.
The control for the hand (named L_Hand_CTRL) must already exist.
Run Rig Arm if you haven’t already, so that the hand control is created. Then orient the finger joints keeping the Z axis as turn axis and the Y axis pointing towards the inner side of the curl. Finally run this command. -
Rig Hand and Mirror This function creates the rig for the selected hand, mirrors the joints and create a rig for the opposite hand.
-
Open Hand Tuner
This function opens a window that allows you to tune the multipliers values of each hand attribute without looking for the corresponding multiplyDivide node in the node editor. It only works if you rigged the hands with the command Rig Hand.
PressCtrland drag with the middle mouse button to increase or decrease the values.
Once the values are set, click on the Save button.
Click Reset if you want to reset the multipliers of the active tab to their default values.
Click Mirror values Left to Right or Mirror values Right to Left, if you want to copy the values entered for one side to the other side on the active tab. Signs are reversed automatically where necessary.
Leg Rig
-
Rig Leg
This function creates the FK and IK rig for leg and foot starting from the joints and two locators. Place the hip, knee, ankle, foot and toe joints (there’s no need to rename them) on the character’s leg. Orient the joints by selecting X as the aim axis, Z axis as the turning axis and so that the Y axis of the foot joint is directed upwards, as Maya world Y axis.
Create two locators, called L_Toe_Roll_LOC and L_Heel_Roll_LOC (use R_ for right side) and place them where you want the rotation pivots for toe roll and heel roll to be.
Select the five joints from hip to toe, insert a scale factor for the control shapes, select the leg side you want to rig and run the command.
The ikHandles for the ankle, the foot and the toe are created and grouped correctly. A control shape for the foot is created and the attributes for toe/heel lift/roll are added.
The pole vector constraint for the knee is also created, with a no-flip knee solution.
On Maya 2020 an attribute is added to control the knee twist via channelbox too. -
Rig Leg and Mirror This function creates the rig for the selected leg, mirrors the joints and create a rig for the opposite leg.
Control Commands
-
Color Selected Controls
This function lets you assign the chosen color to the selected elements. Since it uses the color of the trasform node, make sure you haven’t previously enabled the “Color override” of the shape node (which wins over the color of the transform node) otherwise you won’t see the color you just set with BigRig. -
Color Selected in Outliner
This function lets you assign the chosen color to the outliner name of the transform node of the selected elements. -
Group Selected
This function makes a group on top of the selected element. The name of the new group is equal to the name of the selected element followed by the suffix _GRP.
You have to select one element only to make it work.
If you want the group’s pivot to match translation and rotation of the element’s pivot, tick the checkbox Match pivot. -
Mirror Curve
This function lets you mirror the selected curve along the selected axis.
It doesn’t freeze rotations after mirroring; it’s up to you to freeze theme according to your needs.
If you want to mirror a group you need to tick the box “Include Children”. -
Merge Curves
This function merges the selected shapes under a single transform node.
Select the transform nodes that you want to merge, selecting the one whose pivot you want to keep at last. -
Replace Curve
This function replaces the second selected curve with the first one you selected by deleting the old shape node and parenting the shape node of the new curve to the transform node of the old one. - Rename Selected
This function lets you rename the selected elements in the outliner.-
If you want to add a prefix to the existing name, type the prefix followed by the symbol @.
E.g: L_@
This will rename a node called “Foot_CTRL” as “L_Foot_CTRL”. -
If you want to add a suffix to the existing name, type the symbol @ followed by the suffix.
E.g: @_JNT
This will rename a node called “Head” as “Head_JNT”. -
If you want to replace part of the name, type an asterisk followed by the old string, a comma and the new string in brackets.
E.g: *(_JNT, _CTRL)
This will rename a node called “Head_JNT” as “Head_CTRL”. -
If you want to rename the selected elements with a string and an increasing number, place the starting number between two Dollar signs $ where you want the number to be.
E.g: Spine_$4$_JNT
This will rename a series of joints called “joint1”, “joint2”, “joint3” as “Spine_4_JNT”, “Spine_5_JNT”, “Spine_6_JNT”. -
If you want to rename the selected elements with a string and an increasing number with a specific number of digits, place the starting number between two Dollar signs $ where you want the number to be and add as many hashtags # as needed before the number. The hashtags will be replaced by zeros if the number has a number of digits lower than the one desired.
E.g: Chain_$##4$_JNT
This will rename a series of joints called “joint1”, “joint2”, “joint3” as “Chain_004_JNT”, “Chain_005_JNT”, “Chain_006_JNT”. -
If you want to rename the selected elements with a string and a tag, place the set of tags between two Dollar signs $, separated with a semicolon where you want the tag to be.
E.g: Spine_$Bot;Mid;Top$_CLS
This will rename a series of clusters called “cluster1”, “cluster2”, cluster3” as “Spine_Bot_CLS”, “Spine_Mid_CLS”, “Spine_Top_CLS”.
-
-
Create Text As Curve
This function lets you insert text in the scene as a curve with a single transform node and different shape nodes. - Hide / Show LRA
This function lets you hide or show the Local Rotation Axes of the selected joints, the hierarchy of the selected joint or all the joints in the scene. It is not a toggle as Maya’s default command.
Shapes
- Any icon shape
Click on any icon button to create the corresponding curve.
Select a joint and tick the voice Place Grouped Shape at Selected Joint Position before clicking on an icon if you want to put the selected shape inside a group matching the position and orientation of the selected joint, and rename both the control and the group accordingly.
E.g. if you have selected a joint named Cheek_JNT, after clicking on the desired shape the script creates a control named Cheek_CTRL inside a group called Cheek_CTRL_GRP matching the position and orientation of Cheek_JNT.